Finished Product(s)
Original Design
Smaller board is the same thing, just 3/4" stock with 1/2" square pieces of walnut
Construction
First step is to cut all the strips ~15" long, this measurement should be board thickness plus blade kerf (1-1/2"+3/32") times the number of times you're using the pattern (8) plus a little bit of fluff. I like to get an extra full strip in just in case one comes out wonky plus the last cross cut is always a bit precarious.
Clamped all the segments together. However, on the smaller board, I did just the walnut to cherry (or maple I don't remember) first and then glued the remaining piece in after to experiment with which one worked better... honestly they both had some gaps but the "all at once" configuration seemed to work slightly better, but that could have been because the pieces were larger and probably a bit more forgiving with slight inaccuracies.
After setting up all the pieces in the correct edge pattern (bottom edge is the left edge in the CAD drawing)
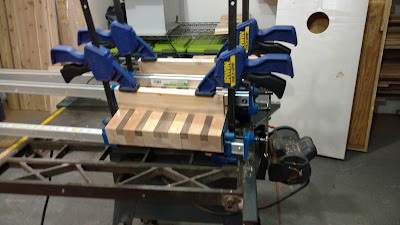
Glued everything together and used some braces to help ensure it was as flat as possible, this pattern is much less forgiving than my other end grain boards since if you plane too much off the crisp corners will no longer line up properly.
After everything had dried, cross cut the segments, this cut will be the height of the final board, 1-1/2", the cut shown is the reason I like having some extra fluff so that I have a longer bottom edge so my cut is more likely to be straight.
Glue everything together for the final glue up (I think this was glue-up #8 for this board, and with the other method this would have been glue-up #12). The pattern is actually the same on both sides just a mirror image so the first four strips are one side and just flip the other four the opposite direction.
After glue up I take the whole board to my 4x36" belt sander to get it flat and to remove any inconsistencies in the glue up, I'll also put the edges through the table saw to straighten those out with a super shallow cut... but I never remember to take pictures of that process.
For the handles I used two stop blocks on my router table and a 1/2" straight cut bit, used the right block as a guide to feed the board in, slide it to the left and back it out when you hit that block, then clean up the front edge by making another shallower pass.
Did each handle in 3 passes to minimize tear out/burning.
And this is the result (kind of) I noticed that the far edges of the handle were pretty thin and didn't want them chipping out easily so I widened it up by another 1/4 of an inch or so to avoid that. These were kind of a pain to sand smooth down the road so I'm not certain this is going to be my default handle style, but it does look nice.
To route the juice groove I brought out the hand held router with an edge guide and bull nose bit, had to drop the RPMs on the router to avoid the maple and cherry burning. Again multiple shallow passes and keep the router moving to avoid burning... maple likes to burn...
At some point in the process I noticed that even when wetting the surface the cherry and maple were very similar in color and the pattern wasn't popping much, I threw some baking soda/water mix on to darken up the cherry, but it ended up darkening both the maple and cherry... which I read it wouldn't do soooo whoops.
Anyway here is the board wet down between raising the grain and sanding.
Soaking in some oil
and the finished product
The smaller board is basically the same exact process just... smaller. I also didn't add handles on it since it's a bit lighter than the 8lbs this board weighs in at. The only other difference is it's about 1" thick, which is a bit shy of what I've read the minimum should be for this type of board should be due to warping, but hopefully it'll hold up.
I think the proportions work a bit better here for the illusion too, so I'll probably adjust the larger board a bit if I ever make another one of these.


