Wednesday, December 27, 2017

More Misc Boards, Tongue Drum, Coat hook

So most of these don't have actual build photos so I thought I'd just do some final pictures all lumped together....

Magnetic bottle opener with catch 


Walnut tray for some quilting supplies I made for my mother


A "scrap" cutting board for my dog walker, Maple, Walnut, Purpleheart and Padauk offcuts from other boards I've made


 Spalted maple and walnut coat hanger for my cube at work


A little tongue drum for my nephew for Christmas


Tuesday, September 19, 2017

Cubs Cornhole Boards


Final product up front


okay so the title of this project really should be "Justin is still terrible at taking photos while he's in the garage" because this is the first photo I took of this project...


Here you can see the mitered corners and the 1/2" inset for the top of the boards that I cut to hide the edges of the ply. Also the pocket screws I used along with glute to attach the top to the sides.


All materials here are birch, top is 1/2" baltic birch ply.


After gluing everything up I had to figure out what length and angle the legs needed to be (turns out it was 11.25°) also apparently before this I cut the hole in the board using my Jasper circle jig and a router, also rounded over the edge to prevent chipping and make it easier on your hands when you carry them.


I'm apparently good at taking photos of my screw ups, here I misplaced the hole for the leg, the original spot I drilled was a bit off, so I had to drill it out and glued a dowel in it's place to cover things up.


With the bolt in place it's pretty hard to see thankfully.


okay so screw up #2 (at least) turns out that the wood filler I used turned grey when it dried rather than tan/brown... guess we're putting a stripe around the edge rather than the center like I had planned. Before painting I put down some light stain (old maple or something to that effect)


Screw up #3 (sorta) buying "Cubs blue" didn't match the vinyl logo I purchased.


much better


Laying out the tape for painting


looking at logo placement after painting 


Pretty nice clean line there. After this it was just 3 coats of matte Arm-R-Seal which after playing on them once or twice seems to give a smooth but not "slick" finish so the bags slide well but don't go flying off like some boards I've used.


So since I didn't take photos of the back before this... I put in corner braces to reinforce the miters since they are inherently pretty weak. Also for the legs, the miter brace was where I normally would have put the legs, and since the brace is at an angle it wasn't a good stop block for the legs, so I screwed in a 3/4"x3/4"x~3" stop block for that purpose. 


The bag holder part is just a Velcro strap held down by staples and a piece of wood, it works okay but I'll probably revisit that a some point as if you want to carry it from the side rather than the hole they can slide out a bit.


Restoring "Big Bertha" a Stanley Type 11 No 7C jointer plane


So my sister frequents garage sales and I got sent this picture and was quite excited to say the least, I've been looking for an old Stanley #7 or #8 for a while now since my shop is too small to have a "real" jointer.


Glamour shot for the "before"


Patent dates from 1901/1902/1910 and a small adjustment knob places it in the 1910-1918 (Type 11) range for original manufacturing. Not in bad shape at all considering it's a century old.


So finally found someone willing to give me an offcut of granite after getting quoted $150-250 from a few places. Cut up a belt from my 4x36 belt sander and we were good to go.


Initializing the sides here, had one low spot that won't go away without a ton of work but I think it adds a bit of character, it's 100 years old no sense in making it look exactly brand new. Not to mention it would have been hours to get that side fully flat below that spot.

Took the belt sander to the cap iron and chip breaker to clean those up a bit. Flattened and sharpened the blade which was in weird shape as it looked like someone had used a dremel and a sanding wheel to clean up the rust previously, super wavey and had some funky free-hand grinding edge profile on it... but finally got it squared up and a good sharp edge put on it


Eventually got it polished as well but didn't snap a pic.


At home with my other planes.


Before 


After... she works!


Glamour shot before painting/refinishing


Next up I used some paint stripper and elbow grease to get rid of the poly on the handles and the chipped/worn paint on the bed


Taped off the sides of the bed and applied a few coats of flat black paint (excuse the super messy bench) handles just got a few coats of danish oil followed up with some paste wax.


And reassembled

Before/After:


A few other glamour shots:


Thursday, September 14, 2017

Maple and Walnut Table Lamp


So apparently I'm terrible at taking photos of my "quick" projects still. 

I had some "scrap" 6/4 maple and 4/4 walnut laying around and decided to make a matching... or at least somewhat similar table lamp to my floor lamp to put on the subwoofer that I use as an end table.


I planed down the walnut to ~1/2" and into 1-1/2" wide strips, the sides run the entire length while the top/bottom are about 1" long or so so that I didn't have to drill the entirety of the block for the cord. Here I'm using a ton of clamps to glue this all up.


Trimmed up the excess and put it on the stand to see about proportions, already it's looking like the shade ring is a bit too small in diameter...


yeah that just looks funky


Better... but still not quite right. Build process for the shade was the same as my floor lamp


This picture looks actually pretty decent but in person it just felt... "off". I ordered a bigger ring but used it as is and every time I walked into the room it didn't seem right so I'm glad I did change it. Also I did away with the walnut base and just routed a small channel for the cord to go out the back.

This is the end result, fairly quick project if I had the 14" rings to start with


Monday, September 11, 2017

Restoring a Stanley No 71 Router Plane


Another plane that game into my possession since my sister has been on the lookout for "old looking tools" I think it was ~$15 which isn't too bad. Lots of surface rust but otherwise in pretty great shape.


Disassembled and ready for a white Vinegar bath, I had begun removing the paint from the handles in the background there getting them ready for a new coat of stain.


After some time with a toothbrush, and soft wire wheel on my dremel everything was cleaning up nicely! Ran the bottom of the plane on some 240 grit to remove some inconsistencies and surface rust, only took a few strokes to do that.


Went with a brass spray paint for most of the components and I actually liked the raw steel look so I just put a clear coat on to protect it a bit from surface rust in the future. Originally these came with a zinc/galvanized finish, but most of the cold galvanization products are pretty terrible.

Blades were missing when I got the plane so I picked up a 1/8" and 1/4" from Lee Valley and they fit perfectly. 

Monday, May 22, 2017

DIY Cherry American Girl Doll Bunk Bed

Finished Product up front


Design

My niece has a few American Girl Dolls and my mother thought it would be nice for her to have a bed to put them in. She had originally bought a friend of the family a bed about a decade ago so we got a hold of it and I took some measurements.


Made a more detailed drawing after finishing here, but I built off the above sketch and adjusted as I went.


Build

First step was to get all the pieces cut to size. For the side rails and headboard I used 4/4 cherry planed down to just over 1/2". The bedposts were 6/4 so about 1-1/4" when all cleaned up.


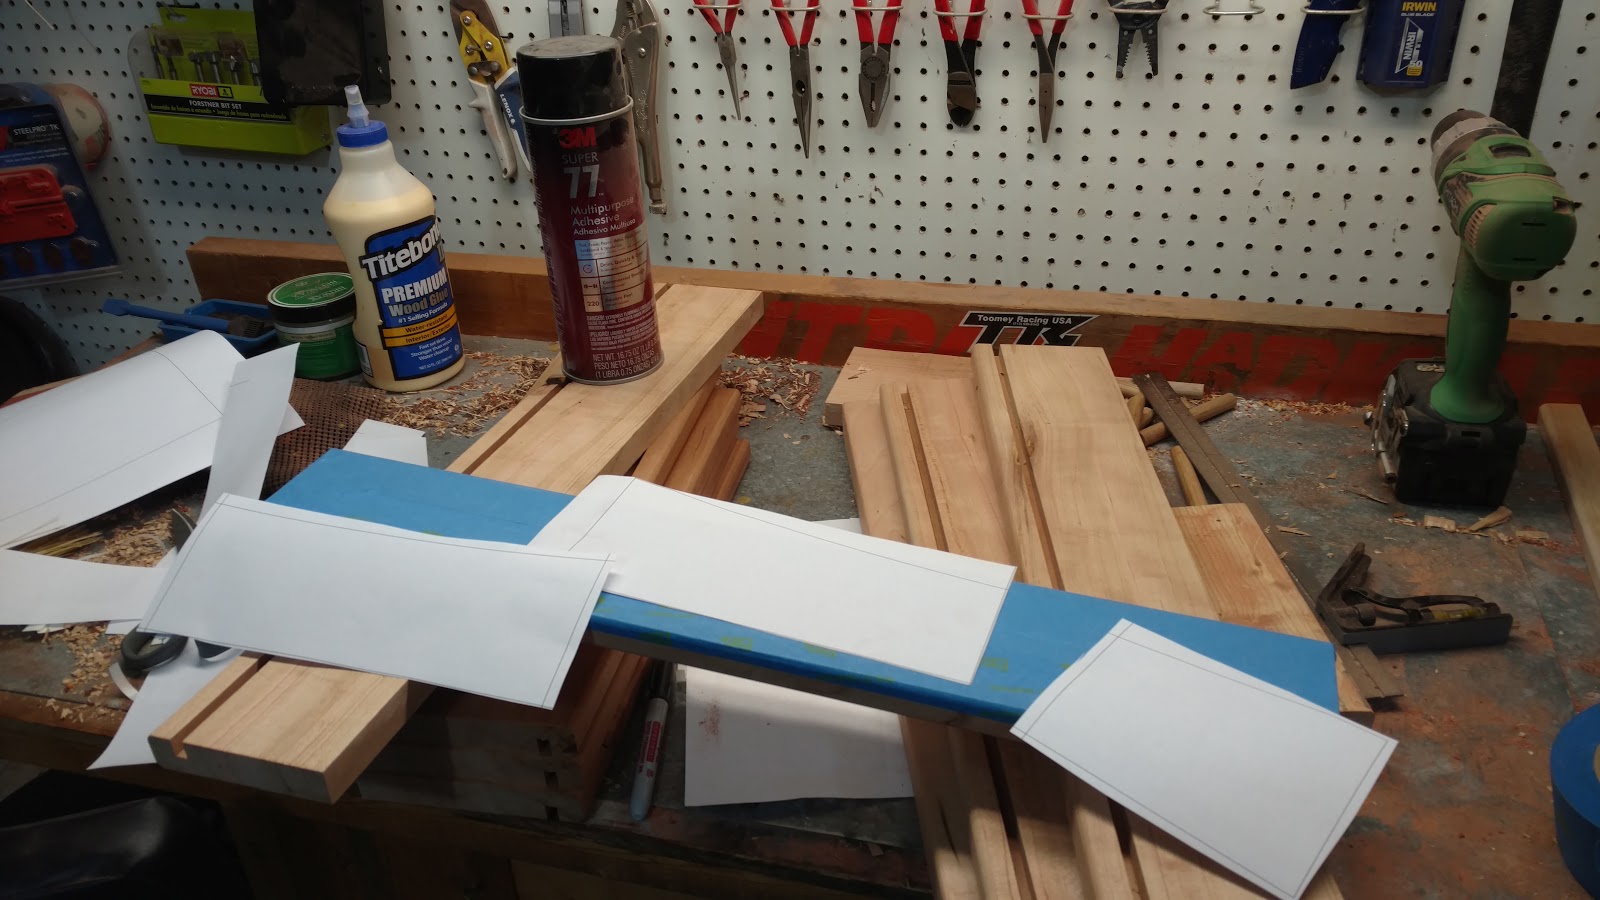
After that I added some curves to the rails and headboard. To do this I just printed out a nice arc on a few sheets of paper, put down some painters tape on the wood and used some Super 88 adhesive to glue the pattern down. This makes it a ton easier to remove later on without having to plane the boards down or remove the adhesive from the wood.


Then I used a jigsaw to cut out the pattern and cleaned them up on the disc sander. 


For the other pieces I traced the first board to the others and rough cut the shape with the jig saw then used the first board as a pattern with my router table and flush trim bit. I didn't have any carpet tape or double sided tape so I made due here with painters tape, it worked pretty well only had one piece slide on me, but that was pretty easy to clean up.


Using the jigsaw first definitely helped as a spiral cut router bit isn't great at hogging out material.

Oh and I lied I actually didn't plane down the boards until after I had shaped them, they just felt very bulky at this point. After planing them down I rounded all the edges.


Dry fitting to look at proportions and to see how large the support for the mattress has to be.


Decided it was a tad bit too wide so ended up cutting off some of the headboards.


At this point I decided I wanted to age the cherry a bit since it was pretty light, so I used a baking soda/water solution to help it darkened the wood a few shades which looked pretty nice, it'll continue to age/darken over time. Wish I had some before/after shots but whoops!

Next was to let the pieces sit for a few months... because I did other projects and wasn't sure how I wanted to do the attachments. I "settled" on just screwing it together and putting caps over the screws... and when I went to buy the screws I accidentally bought a doweling/loose tenon jig instead (beadlocker pro)


after drilling approximately 8000 holes I dry fitted the pieces


Going forward I think I might drill the holes a bit deeper next time as there were some minor gaps in the final fit-up that I think I missed during the initial dry-fit. Also need to take care in making sure everything is squared up when drilling, some of the leg "mortises" were off by a little bit as those took a bit of finagling to clamp in

Finish

Looks good! After looking at all the tiny crevices and corners I decided it'd be easier to apply the finish before assembly. I used Arm-R-Seal gloss for a few coats until I had a nice even surface finish and then applied satin for the final sheen. Going with gloss first helps bring out the figure without muddying it at all.


I think I might have to take back any bad things I've ever said about cherry after this project, super nice to work with and without the stereotypical "cherry" stain it's actually a very beautiful wood with an interesting grain.

Assembly


Glue up was a bit hectic, might have to get some Titebond III for the longer set time in the future so I don't feel as rushed.

Overall it worked fairly well, there are a few small gaps in the joints as I don't think I tightened down the clamps enough but everything is very rigid and stable so it shouldn't be an issue unless someone my size sat on it and rocked around a bunch... but for little kids and dolls it should last quite a few years.


The happy "customer"